AI&Robotics

  • 홈

  • 태그7

  • 카테고리9

  • 아카이브29

  • 검색

Mask RCNN-tensorflow tutorial

작성일 2019-03-27 Edited on 2019-08-07 In code 댓글:

이 내용은 유튜버 Augmented Startups와 Mark Jay을 공부한 내용을 정리한 글입니다.

Augmented Startups: https://www.youtube.com/watch?v=GSDbfGsxruA&t=561s

Mark Jay: https://www.youtube.com/watch?v=lLM8oAsi32g

1. Mask RCNN-tensorflow버전 설치

Mask-RCNN-Tensorflow을 git clone 해준다

1
$ git clone https://github.com/matterport/Mask_RCNN.git

Dependencies을 설치해주자

먼저 필요한 python package들은 설치한다.

1
2
$ cd Mask_RCNN
$ pip install -r requirements.txt

그리고 pretrained model을 다운받고 Mask-RCNN 폴더에 옮겨주자

https://github.com/matterport/Mask_RCNN/releases/download/v2.0/mask_rcnn_coco.h5

이제 cocoapi를 설치하자

1
2
3
4
$ git clone https://github.com/philferriere/cocoapi.git
$ cd cocoapi
$ cd PythonAPI
$ python setup.py build_ext install

설치가 잘되었는지를 확인하기

터미널 창에 jupyter-notebook 입력해 쥬피터 노트북을 실행하고

samples 폴더안에 demo.jpynb를 실행시켜본다.

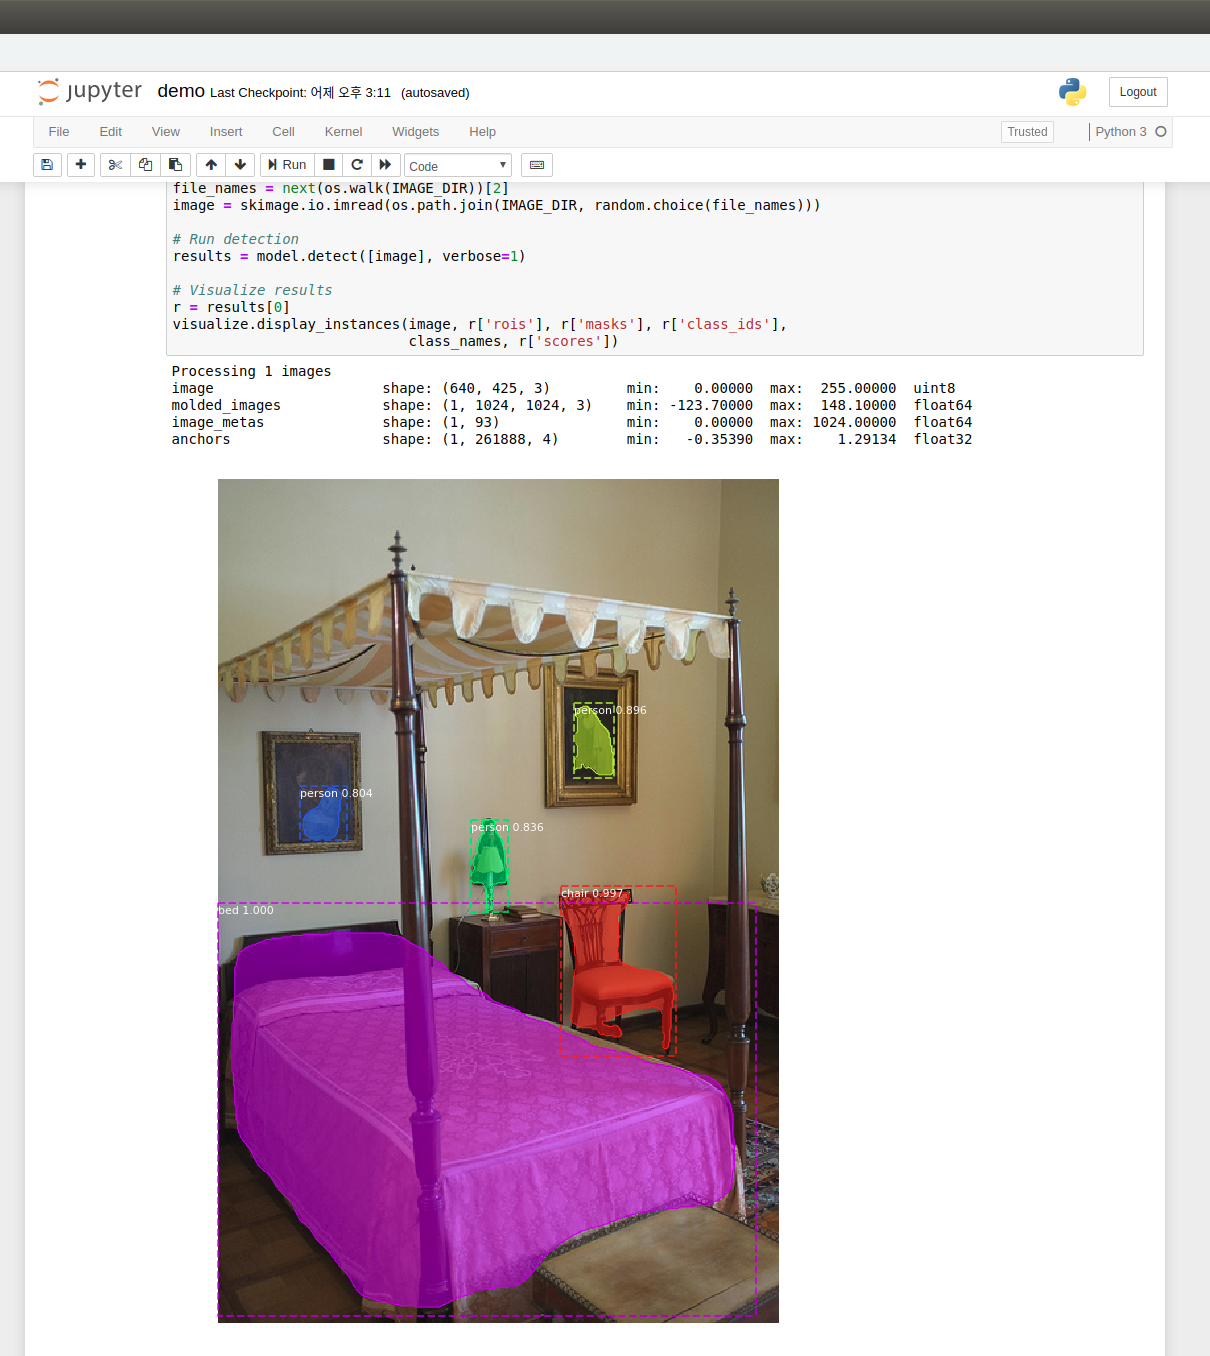
잘 설치된 경우 아래 그림과 같이 랜덤한 사진의 결과가 나온다.

alt

Failed to get convolution algorithm 문제 발생시:

1
2
3
4
5
import tensorflow as tf

sess_config = tf.ConfigProto()
sess_config.gpu_options.allow_growth = True
sess = tf.Session(config=sess_config)

와 같이 텐서플로우를 import하고 sess를 적절한위치에 추가해주자

2. webcam과 video으로 테스트 해보기

webcam과 video 코드는 Mark Jay가 만든 코드를 사용할 것이다.
https://github.com/markjay4k/Mask-RCNN-series 에서

visualize_cv2.py

process_video.py

이 두개의 파일을 다운받는다.

그리고 visualize_cv2.py을 열어 다음과 같이 수정해준다.

1
2
3
4
5
6
7
8
9
10
11
12
13
import utils -> from mrcnn import utils

import model as modellib -> from mrcnn import model as modellib

ROOT_DIR = os.getcwd() -> ROOT_DIR = os.path.abspath("./")

import coco
->
sys.path.append(os.path.join(ROOT_DIR,"samples/coco/"))
import coco

(위에 있던 import coco를 sys.path.append(os.path.join(ROOT_DIR,"samples/coco/"))
추가하고 아래에 옮겨준다. )

Failed to get convolution algorithm 문제 발생하면 위에 해결법을 이용하면 된다.

비디오 테스트에 경우 process_video.py에서

capture = cv2.VideoCapture('비디오 주소') 만 자신의 비디오 주소로 변경하면 된다.

3. 간단한 코드 분석

1
2
3
4
5
6
7
8
9
10
11
12
13
14
15
16
17
18
19
20
21
22
23
24
25
26
27
28
29
30
31
32
33
34
35
36
37
38
39
40
41
42
43
44
45
46
47
48
49
50
51
52
53
54
55
56
57
58
59
60
61
62
63
64
65
66
67
68
69
70
71
72
73
74
75
76
77
78
79
80
81
82
83
84
85
86
87
88
89
90
91
92
93
94
95
96
97
98
99
100
101
102
103
104
105
106
107
108
109
110
111
112
113
114
115
116
117
118
119
120
121
122
123
124
125
126
127
128
129
130
131
132
133
import cv2
import numpy as np
import os
import sys
from mrcnn import utils
from mrcnn import model as modellib
import tensorflow as tf
ROOT_DIR = os.path.abspath("./")
MODEL_DIR = os.path.join(ROOT_DIR, "logs")
sys.path.append(os.path.join(ROOT_DIR,"samples/coco/"))
import coco
COCO_MODEL_PATH = os.path.join(ROOT_DIR, "mask_rcnn_coco.h5")
if not os.path.exists(COCO_MODEL_PATH):
utils.download_trained_weights(COCO_MODEL_PATH)

############# 여기까지 필요한 module import
class InferenceConfig(coco.CocoConfig):
GPU_COUNT = 1
IMAGES_PER_GPU = 1

config = InferenceConfig()
config.display()

############## cudnn 문제 해결 부분
sess_config = tf.ConfigProto()
sess_config.gpu_options.allow_growth = True
sess = tf.Session(config=sess_config)
##############

model = modellib.MaskRCNN(
mode="inference", model_dir=MODEL_DIR, config=config ############# 모델 불러오기
)
model.load_weights(COCO_MODEL_PATH, by_name=True) ############# 모델 weight 불러오기
class_names = [
'BG', 'person', 'bicycle', 'car', 'motorcycle', 'airplane',
'bus', 'train', 'truck', 'boat', 'traffic light',
'fire hydrant', 'stop sign', 'parking meter', 'bench', 'bird',
'cat', 'dog', 'horse', 'sheep', 'cow', 'elephant', 'bear',
'zebra', 'giraffe', 'backpack', 'umbrella', 'handbag', 'tie',
'suitcase', 'frisbee', 'skis', 'snowboard', 'sports ball',
'kite', 'baseball bat', 'baseball glove', 'skateboard',
'surfboard', 'tennis racket', 'bottle', 'wine glass', 'cup',
'fork', 'knife', 'spoon', 'bowl', 'banana', 'apple',
'sandwich', 'orange', 'broccoli', 'carrot', 'hot dog', 'pizza',
'donut', 'cake', 'chair', 'couch', 'potted plant', 'bed',
'dining table', 'toilet', 'tv', 'laptop', 'mouse', 'remote',
'keyboard', 'cell phone', 'microwave', 'oven', 'toaster',
'sink', 'refrigerator', 'book', 'clock', 'vase', 'scissors',
'teddy bear', 'hair drier', 'toothbrush'
]
############## class이미지 이름 지정 (자리순서마다 이미어떤 클래스가 정해져 있고 이를 text로 표현하는 부분이다)


def random_colors(N):
np.random.seed(1)
colors = [tuple(255 * np.random.rand(3)) for _ in range(N)]
return colors
############## class마다 다른 색깔로 segmentation 하기위한 부분

colors = random_colors(len(class_names))
class_dict = {
name: color for name, color in zip(class_names, colors)
}


def apply_mask(image, mask, color, alpha=0.5):
"""apply mask to image"""
for n, c in enumerate(color):
image[:, :, n] = np.where(
mask == 1,
image[:, :, n] * (1 - alpha) + alpha * c,
image[:, :, n]
)
return image

############## segemetation mask를 이미지에 표시

def display_instances(image, boxes, masks, ids, names, scores):
"""
take the image and results and apply the mask, box, and Label
"""
n_instances = boxes.shape[0]

if not n_instances:
print('NO INSTANCES TO DISPLAY')
else:
assert boxes.shape[0] == masks.shape[-1] == ids.shape[0]

for i in range(n_instances):
if not np.any(boxes[i]):
continue

y1, x1, y2, x2 = boxes[i]
label = names[ids[i]]
color = class_dict[label]
score = scores[i] if scores is not None else None
caption = '{} {:.2f}'.format(label, score) if score else label
mask = masks[:, :, i]

image = apply_mask(image, mask, color)
image = cv2.rectangle(image, (x1, y1), (x2, y2), color, 2)
image = cv2.putText(
image, caption, (x1, y1), cv2.FONT_HERSHEY_COMPLEX, 0.7, color, 2
)

return image

############## mask, box, class_name을 모두 이미지에 표시

if __name__ == '__main__':

test everything


capture = cv2.VideoCapture(0)

# these 2 lines can be removed if you dont have a 1080p camera.
capture.set(cv2.CAP_PROP_FRAME_WIDTH, 640)
capture.set(cv2.CAP_PROP_FRAME_HEIGHT, 640)

while True:
ret, frame = capture.read()
results = model.detect([frame], verbose=0)
r = results[0] ############## 여기서 roi,masks, class_id가 나온다.
frame = display_instances(
frame, r['rois'], r['masks'], r['class_ids'], class_names, r['scores']
)
cv2.imshow('frame', frame)
if cv2.waitKey(1) & 0xFF == ord('q'):
break

capture.release()
cv2.destroyAllWindows()

여기서 이용할 수 있는 부분은 results에서 나온 roi, masks, class_id로 어떤물체의 위치와 크기 이다.

Mask-RCNN Train

먼저 https://supervise.ly/이 사이트에 가입하고 사이트에 로그인한다.

alt

그 후

  1. Import 탭에 들어간 후
  2. Import Plugin을 Images로 바꾸고 자신의 데이터셋 폴더를 위 그림의 상자안에 드래그 드랍 합니다.

alt

그러면 위 사진처럼 창이 바뀌면

  1. 칸에 Project이름을 작성한후
  2. Start Import 버튼을 누르면 Import가 됩니다.

alt

  1. Project 탭에 들어가면 그림과 같이 자신이 Import한 이미지의 Project가 생성된 것을 확인할 수 있습니다.

alt

이제 프로젝트를 클릭하고 이미지 폴더에 들어가면 다음과 같은 창이 열린다. 여기서 빨간색 박스가 쳐진 버튼을 클릭합니다.

alt

그러면 이런 창이 뜨는데 여기서 Title에 물체의 label을 지정합니다.

alt

그 후 그림처럼 labeling을 진행 합니다.

alt

그리고 class를 하나더 추가하고 싶으면 위 그림처럼 Create Class를 눌러 추가 해주면됩니다.

alt

labeling을 다 했으면 다시 프로젝트 탭으로 돌아온후 위 그림처럼 Instance segmentation 버튼을 클릭해준다.

alt

  1. Cluster 탭에 들어간 후
  2. Instructions을 클릭합니다.

alt

그러면 위 같은 창이 뜨는데 먼저

  1. nvidia docker를 설치합니다.

alt

  1. Neural Networks 탭에 들어간 후
  2. ADD 버튼을 클릭합니다.

alt

그 후 아래로 내려보면 Mask-RCNN이 있고 ADD버튼을 눌러준다.

alt

Neural Networks 탭에 다시 들어간 후 Train 버튼을 누른다.

alt

  1. 자신의 데이터셋을 input project에 입력해주고
  2. 결과의 project이름을 정해준다.

alt

Train이 끝나면 다음과 같이 새로운 Neural Network가 생기고 여기서 Download를 해주거나 test버튼을 눌러 test 데이터를 test할 수 있다.

만약 Download한다면 .tar파일 안에 model.h5라는 파일 있는데 이 파일을 Mask-RCNN 폴더에 옮겨준다.

alt

그리고 위 코드처럼 바꿔준다. 여기서 NUM_CLASSES 에서 뒤에 있는 2는 자신이 train 시킨 클래스의 수를 적어준다.

https://deepmi.me/linux/18791/

  1. nvidia docker를 설치 했으면 그림에 있는 명령어를 터미널에 입력합니다.

TODO

Mask-RCNN을 자신만의 데이터로 training 하기

deep learning
VNect-tensorflow
Docker,XML,JSON,CSV 간단 공부
  • 목차
  • 흝어보기

Juhwak Kim

29 포스트
8 카테고리
6 태그
  1. 1. 1. Mask RCNN-tensorflow버전 설치
    1. 1.1. Mask-RCNN-Tensorflow을 git clone 해준다
    2. 1.2. Dependencies을 설치해주자
      1. 1.2.1. 먼저 필요한 python package들은 설치한다.
      2. 1.2.2. 그리고 pretrained model을 다운받고 Mask-RCNN 폴더에 옮겨주자
      3. 1.2.3. 이제 cocoapi를 설치하자
    3. 1.3. 설치가 잘되었는지를 확인하기
  2. 2. 2. webcam과 video으로 테스트 해보기
  3. 3. 3. 간단한 코드 분석
  4. 4. Mask-RCNN Train
  5. 5. TODO
© 2020 Juhwak Kim
Powered by Hexo v3.9.0
|
Theme – NexT.Muse v7.3.0